If you’ve ever sat down with your guitar and tried to make your fingers move independently, you know the struggle is real.
Your index obeys.
Your middle follows.
Your ring refuses to cooperate.
And your pinky? Forget about it.
That’s why so many guitarists go hunting for finger independence drills. The problem? Most of them don’t actually work the way you hope.
Why most finger drills fail
- They’re just busywork
Endless chromatic patterns up and down the neck look impressive, but they don’t necessarily build real control. You’re training speed and memorization, not independence. - They isolate the wrong thing
Trying to move one finger without the others isn’t natural—your hand isn’t built that way. The trick is learning to coordinate your fingers, not to separate them completely. - They ignore music
A drill that has no connection to the music you want to play will quickly die in practice. If it doesn’t sound like music, your brain won’t wire it in deeply.
Some of the drills that actually work
1. The “Spider Walk” with a twist
Instead of the standard 1–2–3–4 pattern, try skipping fingers:
- 1–3–2–4 on one string
- Then move across strings, keeping the order.
This forces your hand to break its usual habits while staying musical.
Here’s a list of all the possible combinations:
1-2-3-4, 1-2-4-3, 1-3-2-4, 1-3-4-2, 1-4-2-3, 1-4-3-2
2-3-4-1, 2-4-3-1, 2-4-1-3, 2-3-1-4, 2-1-3-4, 2-1-4-3
3-2-1-4, 3-2-4-1, 3-4-2-1, 3-1-2-4, 3-1-4-2, 3-4-1-2
4-2-3-1, 4-3-2-1, 4-3-1-2, 4-2-1-3, 4-1-2-3, 4-1-3-2
I am thinking of making an extensive post or video on the topic of using the chromatic scale, by itself or intertwined with other scales or arpeggios, so let me know in the comments below, if that’s something that sounds interesting and useful for you.
2. Chord-based finger freedom
Take a simple open chord (say, A minor).
- Keep the chord shape down.
- One by one, lift and replace each finger while the others stay put.
This mimics real playing far better than isolated exercises.
One way you could take this further, would be to always ask yourself: “What’s the shortest path from chord A to chord B?”, in any chord change situation that feels challenging. You will discover that most times, you will only need to move SOME fingers, instead of all of them.
3. String-skipping hammer-ons and pull-offs
Try hammering on from finger 1 to 3 on the A string, then immediately pull off finger 2 to 4 on the G string.
It sounds odd at first, but the sudden switch builds independence under pressure.
4. Musical etudes, not just drills
Pick a short riff, lick, or classical étude designed to stretch fingers (think of something like Carcassi studies or even Satriani-style licks). Practicing music that challenges your fingers sticks far better than exercises in a vacuum.
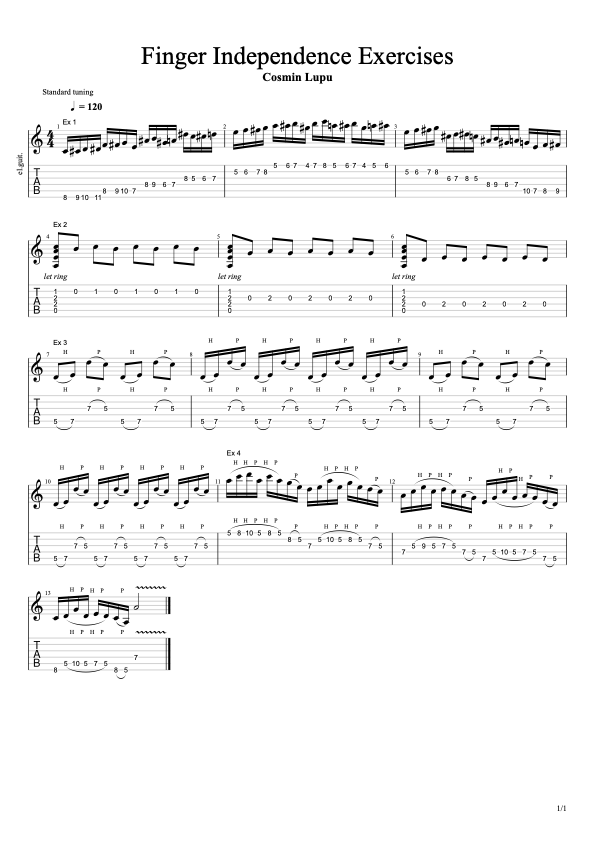
Check out the tabs for the exercises:
The real secret: attention, not reps
It’s not about grinding out thousands of repetitions.
It’s about how present you are when you practice. Notice which finger tends to collapse, which one drags behind, which one resists pressure. Slow practice with awareness builds independence faster than speed drills ever will.
Here’s a backing track that you can use to practice exercises 3 and 4:
👉 Takeaway:
If your drills don’t connect to real music, don’t challenge coordination patterns and don’t keep your brain engaged—they won’t work in real life musical situations.
But if they do, because you have practiced smart? Suddenly, your fingers stop fighting each other and start playing like a team.
Cosmin